


Installer le Pixel Facebook sur son site : comment faire ?
C’est une question qui revient sans cesse : comment installer le Pixel Facebook sur son site internet ? C’est pour y répondre que nous avons développé ce guide complet qui vous expliquera comment installer le pixel sur votre site selon le CMS que vous utilisez. Car oui : il existe plusieurs façons de placer le pixel sur son site, et elles dépendent de la technologie derrière votre site.
Le Pixel Facebook, c’est quoi ?
Avant toute chose, qu’est-ce que le pixel Facebook ? Le Pixel Facebook c’est un tag, c’est-à-dire quelques lignes de code, placé sur votre site et qui permet de suivre les actions des internautes. Le but : savoir comment réagissent vos visiteurs une fois qu’ils ont cliqué sur l’une de vos publicités. Quelles pages consultent-ils ? Ajoutent-ils des produits à leur panier ? Passent-ils leur commande ? Le pixel Facebook vous permettra de récupérer de la donnée très utile pour piloter vos campagnes avec un maximum d’efficacité.
La seconde utilité du pixel Facebook, c’est le retargeting. A chaque fois qu’un internaute visite votre site, Facebook le détecte grâce au pixel. Vous pourrez donc le recibler pour le pousser à la conversion. Un internaute déjà familiarisé avec votre marque aura en effet bien plus tendance à lui faire confiance et à passer une commande. Vous pouvez même aller jusqu’à recibler des internautes qui ont ajouté des produits à leur panier sans les valider, en leur proposant une promotion sur ces mêmes produits !
Vous l’aurez compris, le Pixel Facebook est un outil indispensable pour qui souhaite bien piloter ses campagnes Facebook Ads et faire du Growth Hacking sur Facebook. Mais un problème demeure : son installation pose souvent problème. Découvrons ensemble comment installer le pixel Facebook sur votre site selon le CMS que vous utilisez.
Comment créer son Pixel Facebook ?
La première étape sera d’abord de créer votre pixel. En effet, chaque pixel est unique. Lorsque vous créez votre compte Facebook Ads, vous avez la possibilité de créer un pixel dédié, à placer sur le ou les sites pour lesquels vous allez faire de la publicité.
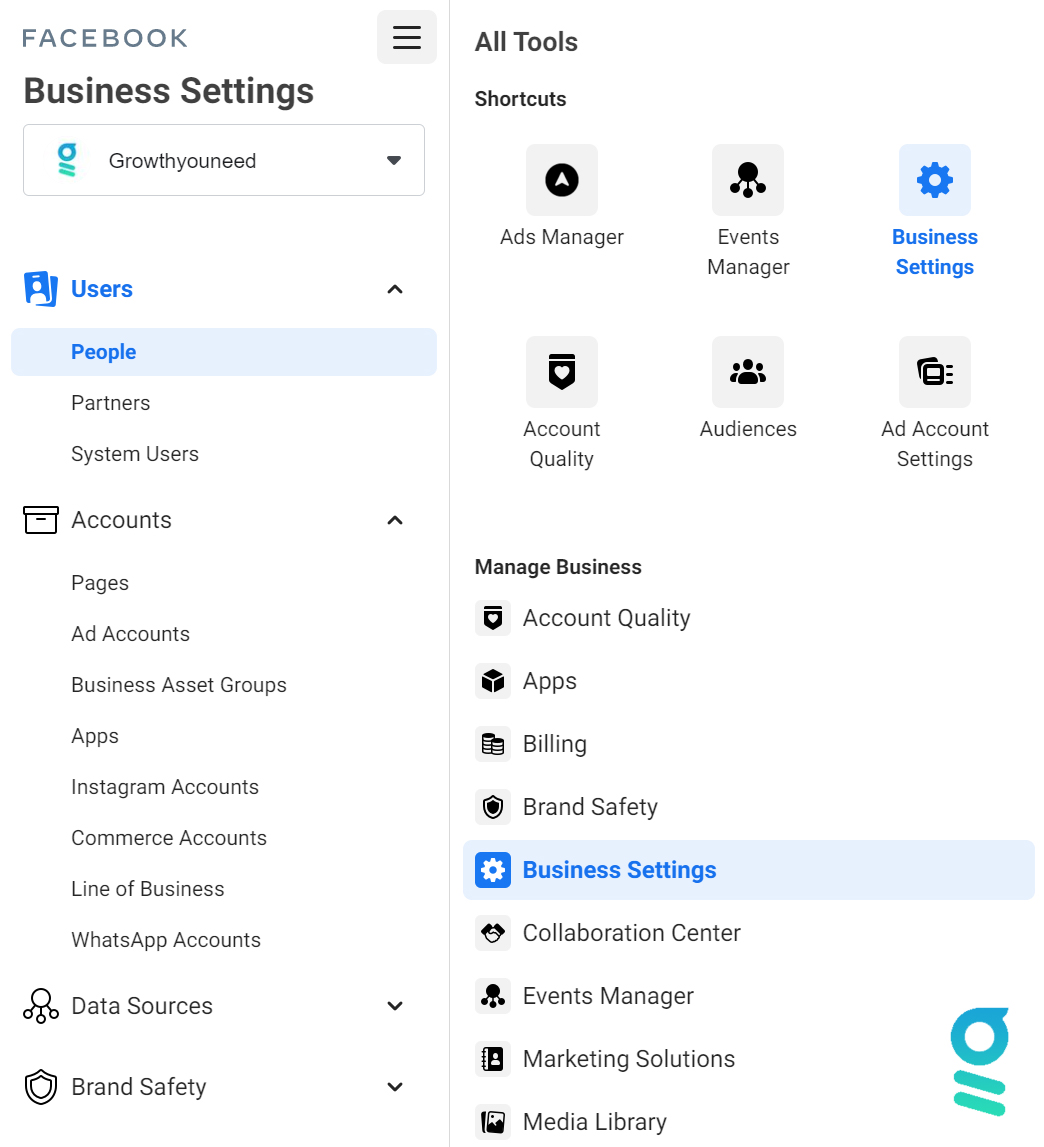
Pour créer votre pixel Facebook, rien de plus simple. Dans votre Business Manager Facebook, cliquez sur Tous les Outils > Paramètres d’entreprise.
Cliquez ensuite sur « Source de données », puis « Pixels » dans le menu qui s’affiche. Vous arriverez sur un dashboard qui recense tous vos pixels existant avec la possibilité d’en créer un nouveau. Cliquez sur « Ajouter » pour créer votre pixel Facebook et suivez les étapes indiquées.
Vous devez d’abord nommer votre pixel. Vous avez ensuite la possibilité de le connecter à votre site web. Nous reviendrons plus tard sur comment faire : vous pouvez ignorer cette étape pour le moment.
Cliquez sur « Continuer ». Et… Voilà. C’est aussi simple que ça. Votre pixel est maintenant créé. Reste à l’installer sur un site.

Installer le Pixel Facebook sur Wordpress
Wordpress équipant aujourd’hui près de 70% des sites du web, il est logique de commencer par ce cas de figure. Si vous voulez installer le pixel Facebook sur Wordpress, rien de plus simple. Il existe même plusieurs façons de le faire.
La première, c’est de passer par le Business Manager, encore une fois. Lorsque vous sélectionnez « Installer le Pixel » dans le Gestionnaire d’événements, vous avez la possibilité de choisir des intégrations partenaires. Wordpress y figure, comme la plupart des CMS populaires du marché. Sélectionnez-le et suivez les quelques étapes décrites. En quelques clics, votre pixel est installé et activé. Rien de plus simple.
La seconde méthode, si vous ne souhaitez pas passer par l’intégration partenaire, consiste à installer un plug-in spécifique sur votre site Wordpress. Il en existe de plusieurs sortes : des plug-ins dédiés au pixel Facebook, ou simplement des plug-ins qui vous permettent d’injecter des tags dans le header de toutes vos pages. Nous vous conseillons cette dernière solution : un seul plug-in vous permettra ainsi d’installer votre Pixel Facebook, mais aussi les tags de Google Ads ou Google Analytics (ou tout autre tag dont vous auriez besoin). L’un des plus populaires s’appelle « Head and Footer Scripts » et vous permettra d’installer tous ces tags sur l’ensemble de vos pages en un simple copier-coller.
Une fois le plug-in installé, vous n’avez qu’à récupérer le code du Pixel Facebook dans votre Business Manager, pour le copier dans le header de votre Wordpress. Un jeu d’enfant !
Installer le Pixel Facebook avec Woocommerce
Si vous faites du e-commerce avec votre site Wordpress, vous aurez peut-être opté pour un plug-in très populaire : Woocommerce. Sachez que vous pouvez toujours installer votre Pixel Facebook comme indiqué précédemment. Mais si vous utilisez Woocommerce, il existe d’autres méthodes.
D’abord, le Business Manager Facebook propose une intégration partenaire spécialement pour Woocommerce. Vous la trouverez là encore au même endroit que pour Wordpress : Tous les outils > Gestionnaire d’événements > Intégrations de partenaires, dans la section « E-commerce ». L’installation du Pixel avec Woocommerce vous permettra de créer un catalogue dynamique : vous n’aurez donc pas à ajouter vos produits à la main, ils se chargeront automatiquement. Vous pourrez alors très simplement créer des publicités autour de ces produits.
Là encore, quelques clics seulement seront nécessaires pour installer et activer votre pixel.
Installer le Pixel Facebook sur Shopify
Shopify est l’un des leaders du e-commerce. En plein essor, la marque a de plus en plus d’adeptes. Aucune surprise donc : on le retrouve dans la liste des intégrations partenaires de Facebook. Pour installer votre pixel Facebook sur Shopify, rendez-vous dans le menu des intégrations partenaires et sélectionnez Shopify. Vous devrez vous connecter à votre compte Shopify et installer le canal Facebook.
Facebook s’occupera alors de connecter votre pixel à votre site via ce canal. Aussi simple que cela !

Installer le Pixel Facebook sur Prestashop
Prestashop est aussi l’une des intégrations partenaires proposées par Facebook Ads. Dans le menu de configuration du pixel, rendez-vous sur « Intégrations partenaires » et sélectionnez Prestashop.
Les étapes sont un peu plus nombreuses que sur les autres CMS, mais Facebook vous guidera à travers toutes.
- Installez les modules « Official Pixel Facebook » depuis le menu Modules de votre Admin Prestashop.
- Cliquez sur « Configuration » et dans le champ dédié, collez votre pixel.
- Vérifiez que la connexion fonctionne bien depuis l’interface de Facebook Manager
- Configurez les événements que vous souhaitez suivre
Félicitations : votre pixel Facebook est installé sur votre site Prestashop.
Installer le Pixel Facebook via GTM (Google Tag Manager)
Si vous étudiez en détail le système des intégrations partenaires, vous verrez qu’il existe de nombreux autres CMS que Facebook prend en compte. Si ce n’est pas votre cas, vous aurez toujours la possibilité de placer le code en dur sur votre site internet.
Il reste tout de même un dernier cas de figure à étudier. Lorsqu’on a plusieurs tags à placer sur son site (Google Ads, Pixel Facebook, Google Analytics…), il est commun de passer par GTM, ou Google Tag Manager. Cela vous permet de centraliser tous vos scripts dans un seul, connecté à votre compte GTM. Voici comment paramétrer votre pixel Facebook depuis GTM.
Connectez-vous à votre compte Google Tag Manager. Il vous faudra créer un nouveau tag. Deux possibilités s’offrent à vous :
- Soit vous sélectionnez « Custom HTML » et vous copiez-collez simplement le code de votre pixel dans la balise
- Soit vous sélectionnez le tag type « Pixel Facebook », qui est un tag déjà paramétré pour les pixels.
Les deux sont valables et fonctionnent très bien. N’oubliez pas de l’activer sur toutes les pages de votre site web avec un Trigger « All Pages – Page View ». Ainsi, à chaque fois qu’un internaute chargera une page de votre site, le pixel sera lui aussi déclenché. Vous pourrez donc suivre toutes ses actions et vérifier qu’il remplit certaines conversions.
Pour vos problématiques de Facebook Ads, faites appel à GrowthYouNeed
Vous souhaitez progresser en Facebook Ads ? Vous êtes au bon endroit ! GrowthYouNeed est une agence de growth marketing avec plusieurs spécialités. Parmi elles : Facebook Ads et le growth hacking sur Facebook. Faites-nous part de votre problématique et nous nous ferons une joie de vous répondre.


.png)


.png)


.png)


.png)


